There's nothing quite like sliding into a warm car on a frosty morning. Your heated seat cover makes those chilly commutes cozy. But, after months of use, spills, and wear, it needs some care.
Many drivers make costly mistakes when cleaning their heated covers. They toss them in the washing machine or use harsh chemicals. These actions can destroy electrical components or ruin the fabric forever.
The good news? Proper maintenance isn't complicated. You just need the right techniques and a little knowledge. Following manufacturer guidelines protects your investment while keeping everything working perfectly.
This guide shows you safe cleaning methods that keep your covers working and looking good. You'll learn simple steps for everyday dirt and stubborn stains. Whether it's coffee spills or general grime, these tips ensure your covers stay reliable for years.
Regular care extends the life of your heated covers significantly. With the strategies we'll share, you can keep them looking fresh and performing flawlessly for countless winter seasons.
Key Takeaways
- Never submerge electrical components in water or use a standard washing machine for heated covers with built-in wiring
- Always disconnect power sources and remove controllers before any cleaning process begins
- Spot cleaning with mild detergent and damp cloths works best for most everyday stains and dirt
- Air drying is essential—heat from dryers can damage wiring and melt protective insulation layers
- Regular vacuuming and quick wipe-downs prevent dirt buildup and reduce the need for deep cleaning
- Check manufacturer instructions first, as different brands have specific care requirements and warranties
- Inspect wiring connections periodically to catch potential safety issues before they become serious problems
Understanding Heated Car Seat Covers
Getting to know your heated car seat cover is key to keeping it in good shape. These covers mix comfort with practical use. Knowing how they work helps avoid damage and extends their life.
Understanding the construction details is crucial. Different parts need different cleaning methods. This knowledge helps you choose the right products and techniques.
The Technology Behind Heated Seat Covers
Heated car seat covers are specialized automotive accessories that warm you up. They have thin heating coils in the fabric. These connect to your car's 12-volt outlet for warmth.
They have three main parts. The outer fabric is comfy and durable. The heating element warms you up. The insulation keeps the heat in.
Most have adjustable temperature controls for your comfort. You can choose from gentle to therapeutic heat. Safety features like timers prevent overheating.
Why Drivers Love Heated Seat Covers
Heated car seat covers do more than just warm you up. They help with back pain by improving blood flow. Doctors often suggest heat therapy for back issues.
They also reduce fatigue and stiffness on long drives. The warmth keeps your muscles relaxed. This is great for road trips and daily commutes.
Winter driving becomes enjoyable with these covers. You don't have to wait for the car's heater. The direct heat is faster and saves fuel.
Following care tips keeps these benefits going for years. Proper maintenance ensures your cover works safely. Regular care prevents damage and extends its life.
Materials That Make Up Your Seat Cover
Heated car seat covers use different materials, each needing its own cleaning method. Knowing what your cover is made of helps you clean it right. The wrong method can harm some materials and damage the heating elements.
Polyester fabric is the most common choice. It's durable, resists stains, and dries fast. The Alexcar heated car seat cover uses premium polyester and carbon fiber for comfort and longevity.
Neoprene is water-resistant, protecting the heating elements. It's good for wet climates or drivers worried about spills. But, it needs gentle cleaning to avoid damage.
Faux leather and genuine leather offer style and easy cleaning. Leather needs special care products to avoid damage to the heating elements. These covers are more expensive but easier to maintain.
Microfiber is soft and distributes heat well. It's breathable to prevent sweating. Microfiber is easy to clean but needs drying to avoid mildew.
Each material affects your cleaning routine differently. Knowing your cover's material before cleaning prevents mistakes. Always check the manufacturer's label for care instructions.
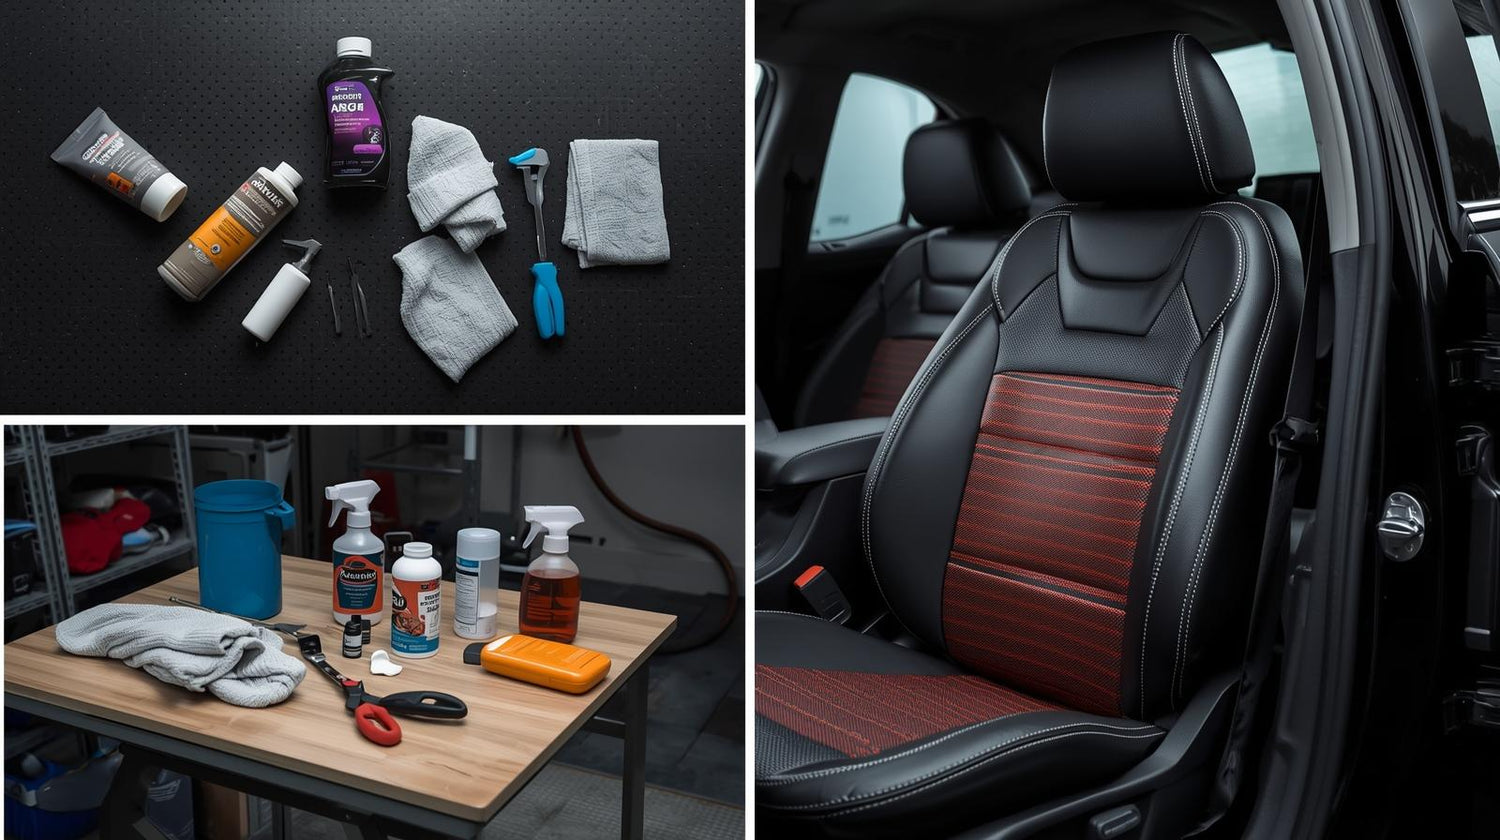
Essential Cleaning Supplies
Using the right cleaning supplies is key to keeping your heated seat cover in top shape. The right products and tools help avoid damage and ensure a deep clean. Before you start, make sure you have everything you need.
The wrong cleaner can harm your seat cover's fabric or electrical system. So, picking the right supplies is as crucial as the cleaning method itself.
Recommended Cleaning Products
Start with a pH-neutral cleaning solution made for car interiors. These cleaners are gentle and won't harm fabric or change colors. Look for ones labeled as safe for upholstery or cars.
For fabric covers, use an upholstery cleaner that doesn't make too much foam. Too much water can damage electrical parts. Spray-on cleaners are good because you can control how much you use.
Leather covers need special care. Use a leather cleaner and conditioner to keep it soft and prevent cracks. Always choose cleaners and conditioners safe for car leather, not for furniture.
Keep distilled water in your cleaning kit. It's great for diluting cleaners and rinsing without leaving mineral deposits that tap water can.
Tools You'll Need
Your tools are as important as your cleaning products. A soft-bristle brush gently removes dirt from fabric and leather. Choose brushes with natural or very soft synthetic bristles.
Microfiber cloths are a must for cleaning car interiors. They soak up moisture well and are gentle on all surfaces. Keep a few on hand for applying, wiping, and drying.
A vacuum with a soft brush attachment removes loose dirt before you clean. This stops dirt from getting ground into the fabric during cleaning.
Spray bottles let you apply cleaner precisely. You can spray lightly to avoid soaking the seat cover. This protects the wiring underneath.
|
Supply Type |
Recommended Item |
Primary Purpose |
Key Benefit |
|
Cleaning Solution |
pH-neutral upholstery cleaner |
Remove dirt and stains safely |
Won't damage fabric or wiring |
|
Application Tool |
Soft-bristle brush |
Work cleaner into material |
Lifts dirt without scratching |
|
Wiping Material |
Microfiber cloths (3-4 pieces) |
Apply, wipe, and dry surfaces |
Highly absorbent and gentle |
|
Dirt Removal |
Vacuum with soft attachment |
Remove loose debris first |
Prevents grinding in particles |
|
Leather Care |
Leather conditioner |
Maintain material flexibility |
Prevents cracking and aging |
Avoiding Harmful Chemicals
Some cleaners can ruin your heated seat cover or damage its electrical system. Never use bleach on your seat cover. Bleach weakens fabric and can cause permanent color changes.
Ammonia-based cleaners are also dangerous. They dry out leather and make fabric brittle over time. These harsh chemicals can also harm the wiring that powers your heating elements.
Petroleum-based solvents might seem good for tough stains, but they harm synthetic materials in seat covers. They also attract more dirt. To keep your seat cover in good shape, avoid these aggressive products.
Abrasive scrubbers and rough brushes can scratch surfaces and attract dirt. These scratches make your seat cover look worn out sooner. Use soft materials designed for delicate surfaces.
Opt for eco-friendly alternatives when you can. Plant-based cleaners and natural solutions like diluted white vinegar work well without toxic fumes. These options are safer for you and better for the planet.
Always read product labels before buying any cleaner. Look for warnings about electrical components or sensitive materials. If unsure, test a small, hidden area first to avoid damage.
Regular Maintenance Tips
Spending a few minutes each month on preventive care is key. It keeps your heated seat covers in top shape for winter. Think of it like changing your car's oil—regular care keeps everything running smoothly.
Many car owners wait until something breaks before checking their covers. But, simple checks each month can extend your covers' life. This quick routine ensures years of warmth and comfort.
Spotting Wear and Tear Early
Regular inspections can spot problems before they get worse. Look at all edges, seams, and high-wear areas. Fraying fabric, loose stitching, or discoloration mean your cover needs attention soon.
Feel the entire surface for rough patches or thinning. Check the areas you sit in most, as they wear out faster. Small tears or loose seams should be fixed right away to avoid more damage.
Don't forget the straps and buckles that hold your cover in place. These parts get worn down over time. Fixing damage early can save you from having to replace the whole cover.
Ensuring Safe Electrical Performance
Electrical parts need careful attention. Always disconnect the power source before handling any electrical components to avoid shock. Check the power cord for fraying, exposed wires, or kinking that could be dangerous.
Look at the plug for bent pins or corrosion. A loose connection can reduce heating efficiency and cause problems. Gently wiggle the plug while it's connected to ensure it fits well.
Quality brands like the Alexcar heated car seat cover have durable connections. But, regular checks keep these systems working right. Look for any discoloration around connection areas, which might indicate overheating issues.
Test the temperature control switch or dial to make sure it moves smoothly. If you notice resistance or hear unusual clicking sounds, these symptoms need further investigation. Document any irregularities so you can track whether problems worsen over time.
Protecting Against Moisture Damage
Water is a big threat to your heated car seat covers. Moisture can corrode electrical elements, promote mold growth, and degrade fabric quality. Never use your covers when they're damp, as this creates both safety risks and material deterioration.
Address spills immediately by blotting with absorbent towels rather than rubbing. Keep microfiber cloths in your vehicle for quick moisture management. If liquid reaches the cover, allow complete drying before reconnecting power—this typically requires 24 to 48 hours depending on humidity levels.
Consider using moisture-absorbing products in your vehicle during humid months. Silica gel packets or automotive dehumidifiers help maintain optimal conditions. Proper ventilation prevents condensation buildup that can damage both fabric and electrical components.
Avoid parking in direct sunlight after rain, as trapped moisture combined with heat creates an ideal environment for mildew. Crack your windows slightly when weather permits to promote air circulation. During winter months, brush snow off your vehicle before it melts and seeps into your covers.
|
Maintenance Task |
Frequency |
Time Required |
Key Focus Areas |
|
Visual damage inspection |
Monthly |
3-5 minutes |
Seams, edges, high-wear zones, attachment straps |
|
Electrical connection check |
Monthly |
2-4 minutes |
Power cord, plug integrity, connection security, control switch |
|
Moisture assessment |
Weekly (winter), Bi-weekly (other seasons) |
1-2 minutes |
Fabric dampness, vehicle humidity, ventilation adequacy |
|
Deep cleaning |
Quarterly |
30-45 minutes |
Full surface cleaning, stain removal, complete drying |
|
Comprehensive inspection |
Twice yearly (spring and fall) |
10-15 minutes |
All components, functionality testing, storage preparation |
Keeping a maintenance log helps track your heated seat cover care activities over time. Note the date of each inspection along with any issues discovered and actions taken. This record becomes invaluable if warranty claims arise or when deciding whether repair or replacement makes more sense.
Set calendar reminders for your monthly checks so they become automatic habits. Many smartphone apps can alert you when maintenance tasks come due. Consistent attention to these basic care principles keeps your covers functioning safely and efficiently for many years.
Cleaning Fabric Seat Covers
Keeping your fabric heated car seat covers clean is easy with the right techniques. Fabric materials are popular for heated covers, but they need gentle care. This is to protect the internal wiring from moisture.
Different fabrics need different cleaning strategies. Polyester covers resist stains well, while microfiber attracts dust. Neoprene materials are water-resistant but can show wear marks if scrubbed too hard.
Proper Vacuuming Methods
Start by vacuuming thoroughly to remove loose dirt and debris. This step prevents dirt from getting ground into the fabric during wet cleaning. Regular vacuuming also means you won't need to deep clean as often.
Use your vacuum's upholstery attachment with medium suction settings. High suction can stress the stitching where heating wires connect. Move the attachment in overlapping rows from top to bottom for complete coverage.
Pay extra attention to crevices where the seat back meets the cushion. Crumbs and dirt accumulate in these tight spaces quickly. A crevice tool helps reach these areas without applying excessive pressure on the fabric.
Vacuum your covers at least once weekly if you use your vehicle daily. This prevents buildup that becomes harder to remove over time. Clean covers also heat more efficiently since dust doesn't block the warming elements.
Removing Spots and Stains
Address spills immediately to prevent permanent staining on your fabric covers. Fresh stains come out much easier than ones that have dried and set. Keep a microfiber cloth in your vehicle for quick response to accidents.
Different stain types require specific cleaning strategies for heated car seats:
- Food and beverage stains: Blot with a damp cloth and mild soap solution
- Grease marks: Apply cornstarch to absorb oil, then vacuum and spot clean
- Ink stains: Use rubbing alcohol on a cotton ball, working from edges inward
- Mud and dirt: Let dry completely, brush off debris, then vacuum thoroughly
Always test your cleaning solution on a hidden area first to check for color fading or fabric damage. The underside edge of the cover works well for this test. Wait 24 hours to see if any discoloration appears.
Use the blotting technique instead of rubbing when treating stains. Press a clean cloth firmly against the stain to absorb the liquid. Rubbing spreads the stain wider and pushes it deeper into the fabric fibers.
Work from the outside edges of the stain toward the center. This prevents the stain from spreading to clean areas. Change to a fresh section of your cloth frequently as it absorbs the stain.
Thorough Deep Cleaning Approaches
Deep cleaning removes embedded dirt that vacuuming and spot treatment can't reach. Plan this intensive cleaning heated car seat covers process every three to six months. More frequent deep cleaning may be necessary if you have kids or pets.
Upholstery shampoo offers the safest deep cleaning option for most fabric covers. Mix the shampoo according to package directions, creating light foam. Apply the foam with a soft brush, working in small sections at a time.
The foam method keeps moisture on the surface rather than soaking through to electrical parts. Scrub gently in circular motions to lift dirt from the fabric. Wipe away the dirty foam with a slightly damp cloth immediately.
Steam cleaning remains controversial for heated seat covers. While steam effectively sanitizes and refreshes fabric, the moisture poses risks to electrical components. Only use steam cleaning if your manufacturer's manual specifically approves this method.
If steam cleaning is approved, keep the steam nozzle moving constantly. Never hold it in one spot, which concentrates moisture. Maintain at least three inches distance between the steamer and the fabric surface.
Proper drying prevents mold, mildew, and electrical damage after any wet cleaning. Open all vehicle doors and windows to promote air circulation. Point a fan at the seats if possible to speed the drying process.
Wait at least 24 hours before reconnecting power to your heated covers. Test the fabric by pressing firmly—it should feel completely dry with no cool dampness. Operating heated covers while moisture remains can cause short circuits or permanent damage.
|
Fabric Type |
Best Cleaning Method |
Drying Time |
Special Considerations |
|
Polyester |
Foam upholstery shampoo |
12-18 hours |
Resists most stains naturally |
|
Microfiber |
Gentle vacuuming and spot cleaning |
8-12 hours |
Attracts dust easily, clean more often |
|
Neoprene |
Damp cloth with mild soap |
6-10 hours |
Water-resistant but shows scratches |
|
Velour |
Soft brush and foam cleaner |
18-24 hours |
Brush pile in one direction only |
Check your cover's care label before choosing a cleaning method. Manufacturers often include specific instructions for their fabric blends. Following these guidelines protects your warranty coverage and extends the life of your heated seat covers.
Cleaning Leather Seat Covers
Leather on heated car seat covers needs gentle care and the right products. It keeps the material soft and damage-free. Without proper care, leather can dry out, crack, or lose its shine.
It's important to know the difference between real leather and synthetic ones. Each type reacts differently to cleaning products. Brands like Alexcar offer heated seat covers with leather options that need consistent care.
Suitable Cleaning Solutions
Choosing the right products is key to cleaning leather seat covers. pH-balanced leather cleaners remove dirt and oils without drying out the material. These cleaners work well on both real and fake leather.
Look for quality leather cleaning products with:
- pH-neutral formulations that won't harm the leather's coating
- Automotive-grade leather cleaners made for car interiors
- Non-ammonia based solutions that prevent drying and cracking
- Moisturizing agents that keep leather's natural oils
- Gentle surfactants that lift dirt without harsh scrubbing
Genuine leather needs milder cleaners than synthetic ones. Always test cleaners on a hidden area first. This step prevents damage to visible parts of your seat cover.
Avoid using household cleaners or products with bleach. These can damage leather and harm the heating elements underneath.
Techniques for Avoiding Scratches
Protecting leather from scratches requires careful technique and tools. Once leather gets scratches, fixing them is hard and expensive. It's better to prevent scratches.
Use only soft, lint-free microfiber cloths for cleaning. These materials won't scratch the leather. Avoid rough sponges, abrasive pads, or stiff brushes that can leave marks.
Clean with gentle, circular motions. Work in small sections with light pressure. If spots are stubborn, let the cleaner sit for a minute before wiping.
Follow this proper wiping technique for cleaning heated car seat covers:
- Dampen your microfiber cloth with cleaner—don't soak it
- Wipe in gentle, circular patterns following the leather's natural grain
- Use a second dry cloth to immediately remove excess moisture
- Work from top to bottom to prevent dirt from spreading to cleaned areas
- Change cloths frequently to avoid redistributing grime
Keep your fingernails trimmed and remove jewelry before cleaning. Rings, bracelets, and sharp nails can scratch leather.
Conditioning the Leather
Regular conditioning keeps leather seat covers looking great and feeling luxurious. It prevents cracking and maintains suppleness. It also protects against aging.
Apply a quality leather conditioner after every cleaning session. These products replenish natural oils that cleaning removes. They create a protective barrier against UV rays, temperature changes, and everyday wear.
Understanding the differences between leather care products helps you choose wisely:
- Conditioners penetrate deep into leather fibers to nourish and moisturize
- Protectants create a surface barrier against stains and spills
- Sealants provide long-lasting protection but may alter leather's natural feel
- UV blockers prevent sun damage and color fading
Apply conditioner sparingly—a little goes a long way. Spread a thin, even layer across the entire leather surface using a clean microfiber cloth. Allow the conditioner to absorb for 15-20 minutes before buffing away any excess with a dry cloth.
The absorption process is important for proper conditioning. Leather should feel soft and slightly moisturized, not greasy or sticky. Over-conditioning can attract more dirt and create buildup on the surface.
Schedule conditioning every 3-4 months for regular maintenance, or more frequently if your vehicle is exposed to harsh sunlight or extreme temperatures. This consistent care routine extends the life of your leather seat covers while keeping them looking showroom-fresh.
Ensure Safety While Cleaning
When cleaning heated seat covers, safety is key. Mixing cleaning liquids with electricity is dangerous. Always follow safety steps to protect your car and yourself.
Heated covers need special care. They can't be cleaned like regular seat covers. Proper safety steps keep them working well for years.
Disconnecting the Power Source
Always unplug your heated car seat covers before cleaning begins. This first step is crucial. Find the power cord and remove it firmly.
For battery-powered covers, take out the battery pack. Keep it in a safe, dry spot. Never clean with power on, even if the heat is off.
Wait five minutes after unplugging. This lets any electrical charge go away. This waiting is a non-negotiable part of cleaning.
Look for quick-disconnect plugs near the seat base. Label them for easy access later.
Avoiding Water Damage
Water is the biggest danger when cleaning heated covers. Keep cleaning methods damp, never wet.
Use the spray-and-wipe method. Spray solution on a cloth, not directly on the cover. This controls moisture and prevents pooling.
Wring out cloths well before use. They should be slightly damp, not dripping. Excess water can damage hidden electrical parts.
Watch for water in seams and folds. These spots trap moisture. Blot them dry with a towel to remove liquid.
Here are ways to control moisture:
- Work in small sections to manage liquid
- Have dry towels ready for blotting
- Use foam cleaners with less water
- Let covers dry for 24 hours before using power
- Clean on warm, dry days to speed drying
Protecting Electrical Components
Heated covers have sensitive wiring and heating elements. Knowing where these are helps you clean safely. Heating wires usually run in lines across the seat, about two to three inches apart.
Feel the cover to find heating element locations. You'll find raised lines or padded channels. Mark these areas mentally for extra caution.
The thermostat and main wiring are near the power connection. Use plastic wrap or a waterproof cover to protect this area. Secure it with painter's tape that won't leave residue.
Be gentle when cleaning around electrical parts. Use soft circular motions with little pressure. Aggressive scrubbing can damage insulation or move parts out of place.
After cleaning, check for dampness and moisture at connection points. Use a dry paper towel pressed firmly on each area.
Here's a safety checklist for heated seat cover care:
|
Safety Step |
Required Action |
Verification Method |
|
Power Disconnection |
Unplug cord and remove batteries completely |
Visual confirmation of disconnected components |
|
Moisture Control |
Use damp cloths only, never saturate fabric |
Touch test—cloth should not drip when squeezed |
|
Component Protection |
Avoid direct liquid contact with electrical areas |
Create physical barriers over wire channels |
|
Drying Verification |
Allow minimum 24 hours air drying time |
Paper towel press test shows no moisture transfer |
|
Final Inspection |
Check all connection points and wire channels |
Visual and tactile examination before power restoration |
Document your safety checks with photos or a simple log. This helps track your maintenance and ensures you follow safety steps. Your careful approach protects your covers and your car's electrical system.
Don't rush through safety steps. They save time and prevent damage. Always take these precautions seriously when cleaning your heated seat covers. A few extra minutes now can save a lot of trouble later.
Removing and Reattaching Covers
Deep cleaning your heated car seat cover might need you to remove it completely. Knowing how to do this right can save you from costly mistakes. Many car owners avoid this because they worry about damaging the electrical system or not being able to put everything back together. With the right approach and a little preparation, you can safely remove and reinstall your covers whenever a thorough cleaning is needed.
The key to success is taking your time and documenting each step as you go. Rushing through removal often leads to broken clips, damaged heating wires, or confusion during reassembly. When you approach this task methodically, you're actively preventing damage to car seat covers while ensuring they continue working properly for years to come.
Preparing Your Workspace and Documentation
Before you begin removing anything, set up a clean, well-lit workspace where you can lay out parts as you disconnect them. Your garage or driveway works perfectly for this project on a pleasant day.
Taking photos with your smartphone is absolutely essential throughout the entire removal process. Snap pictures of how straps are routed, where hooks attach, and how cables connect. These reference images will be invaluable when you're ready to put everything back together.
Gather all your tools before starting. You'll typically need a flashlight, your phone for photos, and possibly a screwdriver if your covers have fasteners underneath the seat. Having everything ready prevents interruptions that might cause you to forget important steps.
Disconnecting Power Sources Safely
Always start by completely disconnecting the power source from your heated seat cover. Locate the power cable that connects to your vehicle's 12-volt outlet or direct wiring harness. Unplug this connection first and tuck the cable aside safely.
If your seat cover connects directly to your car's electrical system, you may need to disconnect the negative battery terminal as an extra safety precaution. This step prevents any accidental short circuits while you're handling the cover and its wiring.
Once disconnected, examine the power cable and controller for any signs of wear or damage. This inspection provides an excellent opportunity to catch potential problems before they become serious issues.
Understanding Different Attachment Styles
Heated seat covers come in several design variations, and each type requires a slightly different removal approach. Knowing your specific style helps you avoid forcing components that might break.
|
Cover Type |
Attachment Method |
Removal Priority |
Common Challenges |
|
Slip-On Style |
Elastic edges with anchor hooks |
Release bottom hooks first, then sides |
Tight elastic can make removal difficult |
|
Strap-Secured |
Adjustable straps underneath seat |
Loosen all straps before removing |
Accessing straps requires reaching under seat |
|
Hook-and-Loop |
Velcro-style fasteners on back |
Peel from top corners downward |
Strong adhesion may require firm pulling |
|
Combination Design |
Multiple attachment methods |
Follow manufacturer sequence |
Complex installations need careful documentation |
Step-by-Step Removal Process
Start your removal at the bottom of the seat where most covers anchor first. Look for hooks, elastic bands, or straps that wrap underneath the seat. Release these bottom attachments first to reduce tension on the entire cover.
Work your way around the seat systematically, moving from bottom to sides to back. Take photos at each stage showing what you're disconnecting and in what order. This documentation becomes your reassembly roadmap.
Pay special attention to how the heating element wires are routed through or attached to the cover. Some designs have wires sewn into pockets, while others attach with clips. Never pull on wires directly—always grasp the connector or housing instead.
For covers with straps underneath the seat, you may need to reach between the seat cushion and backrest to access attachment points. Use your flashlight to see clearly in these shadowed areas. If straps have buckles, release them completely rather than trying to slip the cover off while they're still connected.
Handling Stubborn Attachments
Sometimes clips or hooks refuse to release easily, especially if they've been in place for months or years. Resist the urge to force them. Instead, look for release tabs or buttons that may need pressing before the attachment will disengage.
Elastic straps that have become very tight can be gently worked loose by sliding a finger underneath and gradually stretching the material away from its anchor point. This technique prevents snapping the elastic or breaking plastic hooks.
If you encounter a fastener you can't identify or release, consult your cover's manual or look for online resources specific to your model. Taking five minutes to find the right method beats breaking a component that might be difficult or expensive to replace.
Proper Reattachment Sequence
When you're ready to reinstall your cleaned cover, start with the backrest section first if your cover has separate pieces. Position the cover approximately in place before securing any fasteners. This positioning allows you to ensure everything aligns correctly.
Review your reference photos before attaching anything permanently. Match up the heating element position with where it should sit on the seat. The wires should lay flat without any twists or sharp bends that could damage the internal heating components.
Secure attachments in the reverse order of removal, typically starting at the top and working downward. This sequence helps maintain proper tension distribution across the entire cover.
Achieving Even Tension and Fit
Proper tension is crucial for both comfort and preventing damage to car seat covers during regular use. Too loose, and the cover will bunch up and shift. Too tight, and you risk tearing fabric or damaging heating wires.
After securing the top attachments, smooth the cover downward with your hands, working out any wrinkles or bunched areas. The fabric should lie flat against the seat without excessive pulling or slack areas.
When tightening straps underneath the seat, adjust them evenly on both sides to maintain balanced tension. Tighten gradually, checking the fit on top of the seat after each adjustment. You're aiming for a snug fit that doesn't create pressure points or leave gaps.
Tuck edges neatly into the crevices between seat sections without creating lumps. Use your fingers to push fabric smoothly into these spaces rather than just stuffing it in. Well-tucked edges stay in place better and look more professional.
Reconnecting Electrical Components
Once the cover is physically secured, reconnect the power cable carefully. Make sure the connection is fully seated and secure—a partial connection can cause intermittent operation or potential safety hazards.
Route the power cable along the same path it followed originally, using any clips or guides that keep it organized. The cable should never be stretched tight or pinched between moving seat components.
If you disconnected your car battery, reconnect it now before proceeding to functionality testing. Double-check that the connection is tight and properly oriented.
Visual Inspection Checklist
Before testing the heating function, conduct a thorough visual inspection of your installation. Look for any loose straps, unsecured hooks, or fabric that isn't lying flat. These issues are much easier to fix now than after you've tested everything.
Check that all heating element wires are positioned correctly without visible stress or sharp bends. The controller should be easily accessible and properly secured where you can reach it while seated.
Sit in the seat and feel for any uncomfortable lumps, ridges, or areas where the cover feels loose. Adjust as needed until the cover feels smooth and comfortable across the entire seating surface.
Systematic Functionality Testing
Start with your vehicle running to ensure adequate power supply. Begin testing on the lowest heat setting first to verify basic functionality without risking damage if something isn't connected properly.
Allow the cover to run on low for five minutes, then carefully feel different areas of the seat to confirm that heat is distributing evenly. You should feel warmth spreading across the entire heated surface without any cold spots.
Progress through each heat setting, testing for two to three minutes at each level. The cover should respond to temperature adjustments smoothly, with the controller working as expected. Listen for any unusual sounds like buzzing or clicking that might indicate electrical problems.
Troubleshooting Installation Issues
If the cover doesn't heat at all, first verify that the power connection is secure and that your vehicle's 12-volt outlet is functioning. Try plugging another device into the same outlet to confirm power availability.
Uneven heating often indicates that the heating elements have shifted during installation. Remove the cover and reposition it, paying special attention to keeping the heating wires flat and properly aligned.
If you notice the controller getting hot or any burning smell, immediately disconnect the power and investigate. These symptoms suggest a connection problem or damaged component that needs addressing before continued use.
Final Verification and Documentation
Once everything tests successfully, take a final set of photos showing the completed installation. These images serve as a reference for future removals and can help you remember the correct configuration.
Document any challenges you encountered or tricks you discovered during the process. This personal reference guide makes your next removal and reinstallation even smoother.
Mark your calendar to check all connections and attachments again after one week of use. This follow-up inspection catches any straps that may have loosened or adjustments needed after the cover has settled into place through normal use.
Dealing with Stubborn Stains
Even with careful use, your heated car seat cover will eventually encounter stains that refuse to budge easily. These persistent marks require more than just surface cleaning. The good news is that effective cleaning strategies for heated car seats exist that won't damage the electrical components or materials.
Understanding the right approach for different stain types makes the difference between success and potential damage. Whether you choose natural solutions, commercial products, or professional services depends on the stain's severity and your comfort level with different methods.
Natural Remedies
Natural cleaning solutions offer a safe and effective starting point for stubborn stain removal. These household ingredients work surprisingly well while protecting your heated seat cover's delicate components.
Baking soda paste tackles grease stains effectively. Mix three parts baking soda with one part water to create a thick paste. Apply it directly to the grease stain, let it sit for 15-20 minutes, then gently scrub with a soft brush.
White vinegar diluted with equal parts water removes odors and light stains beautifully. Spray the solution on the affected area and blot with a clean microfiber cloth. The acidity breaks down stain molecules without harsh chemicals.
Mild dish soap mixed with warm water handles food spills remarkably well. Use just a few drops in a cup of water. Apply with a damp cloth, working from the outside of the stain toward the center to prevent spreading.
These natural methods require patience and proper technique. Allow adequate dwell time—typically 10-15 minutes—for the cleaners to penetrate the stain. Always test in an inconspicuous area first to ensure compatibility with your specific cover material.
Commercial Stain Removal Products
When natural remedies fall short, commercial products offer stronger stain-fighting power for cleaning heated car seat covers. The key is selecting products specifically designed for automotive upholstery.
Enzyme-based cleaners excel at breaking down organic stains like blood, sweat, and food. These products contain biological catalysts that digest stain molecules at the molecular level. Apply according to package directions and allow the enzymes adequate time to work—usually 30 minutes to an hour.
Oxygen-based stain removers provide safer alternatives to chlorine bleach. They release oxygen molecules that lift stains without damaging fabric fibers or leather. Products like OxiClean or similar formulations work well on coffee, wine, and juice stains.
Specialized automotive upholstery cleaners come formulated specifically for vehicle interiors. Brands like Meguiar's, Chemical Guys, and Mothers offer products designed to tackle tough marks while being gentle on seat materials.
Before using any commercial product, always perform a patch test on a hidden area. Read the label carefully to verify compatibility with your cover's material—whether fabric, leather, or synthetic. Follow application instructions precisely for best results.
|
Stain Type |
Recommended Solution |
Application Time |
Success Rate |
|
Grease/Oil |
Baking soda paste or enzyme cleaner |
15-30 minutes |
85-90% |
|
Food/Beverage |
Dish soap solution or oxygen-based remover |
10-20 minutes |
90-95% |
|
Ink/Dye |
Rubbing alcohol or commercial automotive cleaner |
5-15 minutes |
60-75% |
|
Blood/Protein |
Cold water with enzyme cleaner |
30-60 minutes |
80-85% |
When to Seek Professional Help
Sometimes stubborn stains require expertise beyond DIY cleaning strategies for heated car seats. Recognizing when to call professionals protects your investment and prevents accidental damage.
Oil-based stains that have set deeply often resist home cleaning methods. Motor oil, transmission fluid, or old makeup can penetrate fabric fibers or leather pores beyond surface treatment. Professional detailers have specialized solvents and extraction equipment that safely remove these persistent marks.
Large spills near electrical components demand professional attention. When liquid spreads across significant areas of your heated seat cover, moisture risks damaging the heating elements. Professionals understand how to clean thoroughly while protecting electrical connections.
If you're uncertain about product safety or proper technique, professional cleaning services offer peace of mind. They carry insurance and have experience with various seat cover materials and heating systems.
Finding reputable automotive detailing professionals requires some research. Look for businesses with specific experience in heated seat cover maintenance. Ask if they've worked with your particular cover brand and material type.
Important questions to ask include: Do they disconnect electrical components before cleaning? What products do they use? Can they provide references from customers with heated seats? What's their policy if damage occurs?
Professional cleaning typically costs between $50-150 per seat, depending on stain severity and your location. While this seems expensive, it's often worth the investment to preserve a $100-300 heated seat cover and avoid replacement costs.
The key to successful stain removal lies in acting quickly, choosing appropriate methods, and knowing your limitations. Fresh stains respond better to treatment than old, set-in marks. Start with gentler natural remedies before progressing to stronger commercial products. And never hesitate to seek professional help when a stain proves too challenging or risky to tackle yourself.
Seasonal Maintenance Checks
Adjusting your maintenance routine with the changing seasons protects your heated seat covers from weather-related damage. Different times of the year present unique challenges that affect both the fabric materials and electrical components. Creating a seasonal car seat cover maintenance schedule ensures your covers remain functional and comfortable year-round.
Temperature extremes impact your heated seat covers in surprising ways. Summer heat can degrade materials while winter cold puts maximum demand on heating elements. By following these care tips for heated seat covers, you'll extend their lifespan significantly.
Protecting Covers During Hot Weather
Summer brings intense heat that threatens your heated car seat covers in multiple ways. Direct sunlight streaming through windows creates temperatures that can reach 150°F or higher inside parked vehicles. This extreme heat fades colors, dries out materials, and weakens electrical connections over time.
Prolonged sun exposure causes fabric covers to become brittle and discolored. The UV rays break down synthetic fibers and natural materials alike. Leather covers suffer even more, developing cracks and losing their supple texture when exposed to sustained heat.
The heating elements inside your covers face serious risks during summer months. High ambient temperatures can compromise the insulation around wiring. Heat stress on electrical components reduces their effectiveness when you need them during cooler months.
Protection starts with simple preventive measures that make a big difference. Window shades or sunshades block direct sunlight and reduce interior temperatures by up to 40°F. Park in shaded areas whenever possible to minimize heat exposure.
Consider using seat cover protectors during summer months. These breathable covers shield your heated seat covers from UV damage. Some car owners in extremely hot climates choose to remove their heated covers entirely during peak summer, storing them in cool, dry locations.
Ventilation techniques prevent damaging heat buildup inside your vehicle. Crack windows slightly when parked to allow hot air to escape. Use your car's ventilation system before sitting down to cool the interior quickly.
Conduct a thorough inspection before fall arrives. Check for any heat-related damage like fading, brittleness, or unusual wear patterns. Test the heating function to ensure summer heat hasn't affected electrical performance.
Getting Ready for Cold Weather
Winter represents prime season for using your heated seat covers, making pre-season preparation essential. A comprehensive car seat cover maintenance routine before temperatures drop prevents frustrating failures when you need warmth most. Starting winter with properly maintained covers saves you from uncomfortable cold-weather commutes.
Begin your winter preparation with thorough functionality testing. Turn on your heated covers and let them run through complete heating cycles. Check that all temperature settings work correctly and heat distributes evenly across the entire surface.
Inspect every electrical connection carefully during your pre-winter check. Cold weather can cause connections to contract and loosen. Tighten any loose plugs and examine cords for wear or damage that might worsen in freezing conditions.
Clean your covers completely before heavy winter use begins. Dirt and debris trapped in fibers can interfere with heat distribution. Fresh, clean covers also feel more comfortable against winter clothing and maintain better hygiene throughout the season.
Verify that control units respond properly to temperature adjustments. Test both low and high heat settings multiple times. Make sure automatic shut-off features engage correctly to prevent overheating or battery drain.
These care tips for heated seat covers during winter preparation include checking the condition of attachment straps and fasteners. Cold weather makes materials less flexible, so ensure everything remains secure. Replace any worn elastic or damaged buckles before winter starts.
Keep a winter emergency kit in your vehicle that includes basic tools for cover adjustments. Temperature fluctuations can sometimes require minor repositioning or tightening. Having supplies on hand prevents small issues from becoming major problems.
Twice-Yearly Comprehensive Reviews
Establishing a biannual inspection routine creates consistency in your car seat cover maintenance program. Spring and fall represent ideal times for detailed examinations. These seasonal transitions allow you to address issues before extreme weather arrives.
A systematic approach to inspections ensures nothing gets overlooked. Create a checklist covering all critical aspects of your heated seat covers. Document your findings to track changes and identify developing problems early.
The following table provides a comprehensive framework for conducting effective biannual inspections:
|
Inspection Category |
Spring Checkpoints |
Fall Checkpoints |
|
Material Condition |
Check for UV damage, fading, brittleness from summer heat exposure; assess fabric integrity and color retention |
Examine for moisture damage, mildew, or wear from summer use; verify material flexibility before cold weather |
|
Electrical System |
Test heating elements after winter use; inspect wiring for cold-weather damage or loose connections |
Verify full heating function before winter; check controller responsiveness and temperature accuracy |
|
Structural Elements |
Assess attachment straps, elastic, and fasteners for winter wear; tighten or replace as needed |
Ensure secure fitting before winter demands; check seams and stitching for separation or fraying |
|
Cleaning Needs |
Deep clean to remove winter salt, dirt, and moisture accumulation; refresh materials for summer |
Pre-winter thorough cleaning to start season fresh; remove summer debris and prepare for heavy use |
Maintenance logs provide valuable insights over time. Record inspection dates, findings, repairs made, and any performance changes noticed. This documentation helps identify patterns and predict when replacements might become necessary.
Early warning signs often appear during biannual inspections if you know what to look for. Uneven heating, unusual odors, or delayed warming indicate developing electrical issues. Material changes like excessive wear in specific areas or persistent stains suggest cleaning routine adjustments.
Schedule professional inspections when you notice anything unusual during your checks. Trained technicians can identify problems that aren't obvious to untrained eyes. Annual professional evaluation complements your biannual self-inspections for comprehensive care.
Your biannual reviews should include testing in realistic conditions. Run your heated covers for extended periods to simulate actual use. This reveals issues that might not appear during brief tests.
Document your inspection findings with photos when possible. Visual records help track degradation over time. Comparing images from previous inspections makes subtle changes more apparent.
This seasonal approach to car seat cover maintenance keeps your heated covers ready to provide comfort whenever needed. Regular attention prevents small problems from becoming expensive replacements. By adapting your care routine to seasonal demands, you maximize both performance and longevity.
Troubleshooting Common Issues
Even with the right care, problems can still happen. Knowing how to find and fix issues can save you time and money.
Spotting Electrical Troubles
Your seat cover won't heat up? First, check the power connection. Make sure the plug fits well into your car's outlet. Try different heat settings to see if any work.
Look for warm and cold spots on the seat. Uneven heating might mean a damaged wire. If you smell burning, unplug the cover and check the wiring for damage.
Knowing Replacement Time
Looking after your seat cover can make it last longer. But, every cover will eventually need to be replaced. Watch for signs like fabric tears, complete heating failure, or frequent repairs.
Good heated covers usually last three to five years. If your cover is old and needs expensive fixes, it might be time for a new one.
Quick Answers to Common Questions
Can you machine wash heated covers? Most makers advise against it. Hand washing is safer for almost all models.
How often should you deep clean? Do it two to three times a year, depending on how much you use it.
Can you fix heating elements yourself? Simple wire fixes are okay for DIY. But, fixing internal elements needs a pro to avoid fire risks.
Your heated seat cover keeps you cozy in the cold. With regular care, it will keep working safely for years.
FAQ
Can I machine wash my heated car seat cover?
No, most heated car seat covers shouldn't be machine washed. The washing machine's agitation and water can damage the electrical parts. Some covers have removable heating elements for washing, but always check the care label first.
If your cover doesn't have removable parts, clean it gently by hand. This keeps the electrical parts dry. If you're unsure, contact the manufacturer for advice.
How often should I deep clean my heated seat covers?
Deep clean your heated car seat covers 2-3 times a year. If you have kids, pets, or eat in your car, you might need to do it more often. Vacuuming and spot cleaning between deep cleans helps. Deep clean before winter and after to remove salt and grime. Make sure the covers are dry before using them again to avoid damage.
What should I do if my heated seat cover stops working?
First, check the power connection. Make sure it's secure and plugged in correctly. Test another device in the outlet to see if it's working. Look for visible damage to the wiring or heating elements. If you've cleaned the cover, let it dry completely before using it again. If it still doesn't work, contact the manufacturer.
Are aftermarket cleaning products safe for heated seat covers?
Many cleaning products are safe, but choose ones made for cars. Avoid bleach, ammonia, and harsh chemicals. They can damage the cover. Always test a small area first. If you're unsure, use mild soap or cleaners recommended by the manufacturer. Clean gently to avoid damaging the electrical parts.
Can I use my heated seat covers in summer, or should I remove them?
You can keep them in during summer, but take precautions. Unplug them when not in use to prevent accidental heating. Extreme heat can damage the covers. Consider using sunshades or parking in the shade. Some people remove them in summer for a different look.
What's the best way to remove pet hair from heated seat covers?
Use a soft-bristle vacuum attachment to start. For stubborn hair, try a dampened rubber glove. Lint rollers and squeegees also work well. Avoid duct tape to prevent damage. Regular vacuuming helps prevent hair buildup. Consider using a pet blanket for easier cleaning.
How do I know if moisture has damaged the electrical components?
Look for signs like failure to heat, uneven heating, or flickering. Strange smells or visible damage are also warning signs.Wait 24 hours to ensure the cover is dry before using it again. If you suspect damage, don't use it and contact the manufacturer.
Can I repair heating elements myself, or should I hire a professional?
Simple repairs like reconnecting plugs are safe DIY. But, complex repairs need electrical knowledge and tools. Professional repair ensures safety and proper function. If unsure, contact a specialist. Improper repairs can be dangerous.
What's the average lifespan of a heated car seat cover with proper maintenance?
With care, they last 3-5 years. Premium brands can last 7-10 years. Proper maintenance and usage extend their life. Regular cleaning and inspections help. Neglecting maintenance shortens their life. Quality covers provide long-term comfort and value.
Is it safe to use heated seat covers with leather car seats?
Yes, but be cautious. Use lower heat settings to avoid drying out the leather. Choose covers with protective layers. Inspect the leather regularly. Use leather conditioners for protection. Quality brands ensure safety for leather seats.
Can I leave my heated seat cover plugged in when not in use?
You can, but it's better to unplug. It saves power and prevents accidental heating. Unplugging also extends the cover's life. Leave them plugged in only during winter use. Unplug during extended parking to avoid battery drain. Modern covers have safety features, but unplugging is still safer.
What temperature setting should I use on my heated seat cover?
Choose a setting based on comfort and weather. Medium is usually best for most conditions. Start with low for slight chill and high for extreme cold.Adjust as needed to avoid overheating. Some covers have automatic settings. Experiment to find your comfort level.


Leave a comment
This site is protected by hCaptcha and the hCaptcha Privacy Policy and Terms of Service apply.