Your car's interior is where you spend countless hours, so why not make it a space you truly enjoy? DIY car interior upgrades can transform your daily commute from mundane to magnificent without breaking the bank. Whether you're looking to increase comfort, boost resale value, or simply express your personal style, these budget-friendly modifications can make a world of difference.
In this comprehensive guide, we'll walk you through simple yet effective DIY car interior upgrades that anyone can tackle, regardless of experience level. With just a few tools, some creativity, and a weekend afternoon, you'll be amazed at how dramatically you can enhance your vehicle's interior.
Benefits of DIY Car Interior Upgrades
Why Upgrade Your Car Interior
- Personalize your vehicle to match your style and preferences
- Increase comfort during daily commutes and long drives
- Potentially boost your car's resale value with strategic upgrades
- Save money compared to professional interior modifications
- Protect original upholstery from wear and tear
- Refresh older vehicles without buying a new car
Common Challenges
- Finding the right materials that match your car's existing interior
- Ensuring proper installation to avoid damage
- Balancing cost with quality for long-lasting results
- Managing time expectations for more complex upgrades
- Maintaining a cohesive look across different modifications
The good news is that with proper planning and the right approach, these challenges can be easily overcome. Our step-by-step guide will help you navigate each upgrade with confidence.
Essential Materials and Tools
Before diving into your DIY car interior upgrades, gather these budget-friendly materials and essential tools to ensure a smooth process:
Materials
- Seat covers (fabric, neoprene, or faux leather)
- LED light strips with 12V adapter
- Vinyl wrap sheets in your preferred color/pattern
- Premium floor mats (rubber or carpet)
- Steering wheel cover or wrap material
- Dashboard polish or protectant
- Fabric cleaner and conditioner
- Double-sided automotive tape
- Cable ties and wire clips
- Fabric adhesive spray
Tools
- Basic screwdriver set (Phillips and flathead)
- Trim removal tools (plastic pry tools)
- Utility knife or scissors
- Heat gun or hairdryer (for vinyl application)
- Measuring tape
- Microfiber cloths
- Wire cutters/strippers
- Needle and thread (for steering wheel wrap)
- Cleaning brushes for detailing
- Electrical tape
Get Started With Quality Materials
For best results, invest in quality materials that will stand the test of time. Check out these affordable DIY car interior upgrade kits that include everything you need for a complete transformation.
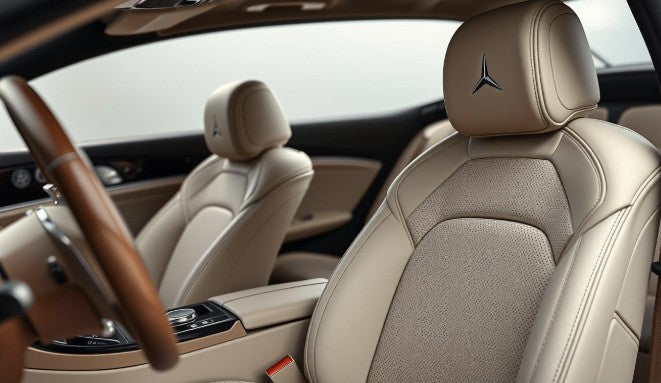
Replacing Seat Covers
One of the most impactful DIY car interior upgrades is installing new seat covers. Fresh covers can completely transform your car's look while protecting the original upholstery from wear and tear.
How to Measure Your Seats
Proper measurements ensure your new seat covers fit perfectly. Follow these steps:
- Measure the width of the seat cushion from side to side
- Measure the depth from front to back of the seat cushion
- Measure the height of the seat back from bottom to top
- Note any special features like integrated headrests or armrests
- Check if your seats have side airbags (you'll need compatible covers)
Installation Steps
Follow this simple process to install your new seat covers:
- Remove headrests if possible (consult your car manual)
- Clean the seats thoroughly and allow to dry completely
- Identify which cover is for each seat (front/back, driver/passenger)
- Slip the cover over the top of the seat and pull down firmly
- Tuck the sides of the cover between the seat cushion and backrest
- Secure any straps or hooks underneath the seat
- Smooth out wrinkles and adjust for a tight fit
- Reattach headrests through pre-cut holes in the cover
Pro Tip: For a smoother installation, warm the seat covers with a hairdryer first. The slight heat makes the material more pliable and easier to stretch over the seats.
Find Your Perfect Seat Covers
Looking for durable, affordable seat covers that fit your specific vehicle model? Browse our selection of custom-fit options in various materials and colors.
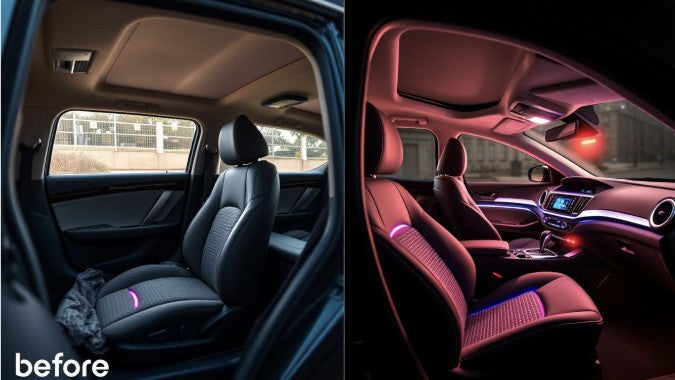
Installing Ambient Lighting
Ambient lighting adds a premium feel to any car interior and is surprisingly easy to install. With just a few LED strips and basic wiring knowledge, you can create a customized lighting experience that transforms your car's atmosphere.
Materials Needed
- 12V LED light strips (RGB if you want color options)
- 12V car adapter or direct wiring kit
- Wire connectors and electrical tape
- Adhesive clips for securing wires
- Remote control (if using RGB lights)
Safe Installation Guide
- Plan your lighting layout (footwells, under dashboard, door panels)
- Clean surfaces thoroughly where lights will be attached
- Test all lights before installation to ensure they work properly
- Disconnect your car battery before any electrical work
- Cut LED strips to appropriate lengths (only cut at designated points)
- Remove adhesive backing and apply strips to clean surfaces
- Route wires discreetly under trim panels and carpets
- Connect to power source (cigarette lighter adapter or direct to fuse box)
- Secure all loose wires with clips or cable ties
- Reconnect battery and test your new lighting system
Safety Warning: When working with your car's electrical system, always disconnect the battery first. If you're unsure about direct wiring, use a cigarette lighter adapter instead. Never leave exposed wires that could cause shorts.
Light Up Your Interior
Ready to add some ambiance to your ride? Our easy-to-install LED lighting kits come with everything you need, including detailed instructions for safe installation.
Dashboard Customization
Your dashboard is the centerpiece of your car's interior and one of the most noticeable areas when you're driving. Customizing it can dramatically change the look and feel of your entire car interior.
Vinyl Wrap Application
Vinyl wrapping is an affordable way to completely transform your dashboard's appearance. Here's how to do it right:
- Clean the dashboard thoroughly with alcohol-based cleaner
- Remove any detachable components (knobs, vents, trim pieces)
- Measure and cut vinyl pieces slightly larger than needed
- Use a heat gun or hairdryer to warm the vinyl for flexibility
- Start application from the center, working outward
- Use a plastic card or squeegee to remove air bubbles
- Trim excess vinyl with a utility knife
- Use the heat gun to help vinyl conform to curves
- Reattach any removed components
Dashboard Polishing and Protection
If you prefer your original dashboard but want to refresh its appearance:
- Clean thoroughly with appropriate cleaner (based on material)
- Apply a UV protectant to prevent fading and cracking
- Consider a dashboard mat for added protection and style
- Use a microfiber cloth for regular dusting and maintenance
Pro Tip: For complex dashboard shapes, consider using smaller pieces of vinyl rather than one large sheet. This makes it easier to handle curves and contours without creating wrinkles or bubbles.
Floor Mat Upgrades
Quality floor mats not only protect your car's carpet but also enhance the overall appearance of your interior. Choosing the right type can make a significant difference in both functionality and style.
Rubber vs. Carpet Floor Mats
|
Feature |
Rubber Mats |
Carpet Mats |
|
Durability |
Excellent for heavy use |
Good with proper care |
|
Water/Spill Protection |
Superior with raised edges |
Limited absorption |
|
Cleaning Ease |
Very easy (hose off) |
Requires vacuuming/washing |
|
Appearance |
Functional, utilitarian |
Luxurious, refined |
|
Cold Weather |
Stays flexible |
Provides warmth |
|
Cost |
$20-$80 |
$30-$150 |
Installation Tips
- Remove and thoroughly clean the area under old mats
- Ensure new mats have non-slip backing or secure with anchors
- Trim custom-fit mats if necessary (follow manufacturer guidelines)
- Position driver's side mat so it doesn't interfere with pedals
- Check that mats lie flat without bunching or overlapping
Safety Note: Improperly fitted floor mats can slide under pedals and cause accidents. Always ensure your driver's side mat is properly secured and doesn't interfere with pedal operation.
Protect Your Car's Floor
Ready to upgrade your floor mats? Browse our selection of custom-fit options designed specifically for your vehicle model.
DIY Steering Wheel Wrap
Your steering wheel is one of the most frequently touched surfaces in your car. Upgrading it with a custom wrap not only improves grip and comfort but also adds a personalized touch to your interior.
Materials Needed
- Steering wheel wrap material (leather, suede, or synthetic)
- Heavy-duty thread and needle (for stitched wraps)
- Contact adhesive or double-sided tape
- Scissors or utility knife
- Measuring tape
- Thimble for protection while stitching
Stitched Wrap Method
- Measure your steering wheel's circumference and width
- Cut your wrap material with 1-inch overlap allowance
- Start wrapping from the bottom of the wheel
- Pull material tight and secure temporarily with clips
- Use a running stitch along the inside edge of the wheel
- Continue stitching around the entire wheel
- Finish by securely knotting the thread
- Trim any excess material
Adhesive Wrap Method
- Clean the steering wheel thoroughly with alcohol
- Apply contact adhesive to both the wheel and wrap material
- Allow adhesive to become tacky (follow product instructions)
- Start applying from the bottom, working in small sections
- Stretch material slightly as you go for a tight fit
- Press firmly to ensure good adhesion
- Trim excess material with a sharp utility knife
Pro Tip: If you're not confident in your stitching abilities, consider a pre-stitched steering wheel cover that slips over your existing wheel. These are available in various materials and designs.
Upgrade Your Grip
Want a simpler solution? Check out our selection of premium steering wheel covers that provide the perfect combination of style, comfort, and improved grip.
More Budget-Friendly DIY Car Interior Upgrades
Beyond the major upgrades we've covered, there are several other affordable modifications you can make to enhance your car's interior:
Storage Solutions
- Install seatback organizers for rear passengers
- Add console organizers for small items
- Use trunk dividers to keep cargo secure
- Mount phone holders for convenient access
Comfort Enhancements
- Add lumbar support cushions to seats
- Install window tint for heat reduction
- Use door panel protectors for arm comfort
- Add cup holder inserts for better fit
Tech Upgrades
- Install USB charging ports
- Add Bluetooth adapter for older cars
- Mount tablet holders for rear entertainment
- Upgrade interior bulbs to LED
Budget Tip: Many of these smaller upgrades can be found at discount stores, online marketplaces, or even repurposed from household items. Get creative with your solutions to save even more money!
Pro Tips and Common Mistakes to Avoid
Even simple DIY car interior upgrades can go wrong without proper planning and execution. Here are some professional tips and common mistakes to avoid:
Common Mistakes
- Poor Measurements: Always measure twice before cutting or purchasing materials
- Rushing Installation: Take your time, especially with adhesives and wraps
- Mismatched Colors: Request material samples to ensure colors match your interior
- Ignoring Instructions: Read manufacturer guidelines for all products
- Improper Cleaning: Always clean surfaces thoroughly before applying adhesives
- Overlooking Safety: Ensure modifications don't interfere with airbags or controls
Professional Tips
- Test First: Test materials and techniques on small, hidden areas before full application
- Work Warm: Many materials are more pliable and easier to work with when slightly warm
- Take Photos: Document the original state before disassembly for reference
- Organize Parts: Use labeled containers for screws and small components
- Quality Tools: Invest in proper trim removal tools to prevent damage
- Patience Pays: Allow adequate drying time for adhesives and cleaners
"The difference between a professional-looking DIY upgrade and an amateur job is often just patience and attention to detail. Take your time, follow instructions carefully, and don't rush the process."
- Professional Auto Detailer
Conclusion: Your Personalized Car Interior
DIY car interior upgrades offer an affordable way to transform your vehicle into a space that truly reflects your personality and meets your needs. From practical improvements like seat covers and floor mats to aesthetic enhancements like ambient lighting and dashboard customization, these budget-friendly modifications can dramatically improve your driving experience.
Remember that the best upgrades are those that balance form and function. Choose modifications that not only look good but also serve a purpose in your daily driving routine. And don't be afraid to get creative—some of the most impressive car interiors come from thinking outside the box.
With the step-by-step guides and tips provided in this article, you're well-equipped to tackle these DIY car interior upgrades with confidence. Start with one project, build your skills, and gradually work your way through transforming your entire car interior on a budget that works for you.
Ready to Transform Your Car Interior?
Get all the supplies you need for your DIY car interior upgrades in one place. Our curated selection includes quality materials at budget-friendly prices.
Frequently Asked Questions
How much can DIY car interior upgrades increase my vehicle's resale value?
While DIY upgrades won't typically add as much value as professional work, strategic improvements can increase resale value by 5-15%. Focus on universal appeal with neutral colors and quality materials. Keep original parts to restore the car if needed before selling.
Can I install ambient lighting without any electrical knowledge?
Yes! Many ambient lighting kits are designed for beginners and connect directly to your cigarette lighter or USB port. These plug-and-play options require no splicing or electrical knowledge. For more complex installations, consider watching tutorial videos or consulting a professional.
How long do DIY car interior upgrades typically take to complete?
Time requirements vary by project: seat covers (30-60 minutes), floor mats (10 minutes), steering wheel wrap (1-2 hours), dashboard vinyl (2-4 hours), and ambient lighting (1-3 hours). Plan accordingly and don't rush—quality results take time.
Will DIY modifications void my car's warranty?
Most cosmetic interior modifications won't void your warranty. However, any modifications that affect electrical systems or structural components might. Always check your warranty terms before making significant changes, and avoid permanent modifications if you're concerned.
What's the best DIY upgrade for someone with minimal tools and experience?
Seat covers and steering wheel covers are ideal starter projects. They require minimal tools, offer significant visual impact, and are relatively forgiving for beginners. As you build confidence, you can tackle more complex projects like dashboard customization or ambient lighting.
Leave a comment
This site is protected by hCaptcha and the hCaptcha Privacy Policy and Terms of Service apply.